Lip syncing for Loading Zone
Quick Tip!
Make sure all of the voiceover files are organized before editing the lip sync. It will make editing much easier.
Helpful Staff for this Topic


When editing an episode for the Loading Zone, you must lip sync the recorded voiceover with the mouth movements of the animated robots. This article explains the process of how to sync the recorded voiceover with the characters’ animated mouths.
Making the Lips Sync with Voiceover
Quick Tip!
Make sure to edit your lip syncs! Automated sequences can miss words or syllables, and that will be much harder to fix during the review process.
First, open Adobe Character Animator. Then, import the files below for each character you need to lip sync from the project folder named:
The Loading Zone > Projects Assets > 00_general_assets >
- Billy-lipsync.ai
- Penelope-lipsync.ai
- Addison-lipsync.ai
Also import the voiceover recording files.
After importing all the files, it is time to edit. At the top of Character Animator, click the Scene dropdown menu and click New Scene. This will create a new scene workspace. You should create a new scene workspace for each individual line spoken by a character. These will each be exported as individual lines once you have finished your lip sync.
Drag a character’s lipsync file into the timeline from the Project panel, and then drag the voiceover file into the timeline underneath the lip sync file. Trim the voiceover file so that it only includes the one line you want to animate in that scene. Then click the Timeline dropdown menu at the top, and click Compute Lip Sync Take From Scene Audio. This will automatically match the audio with the mouth movements.
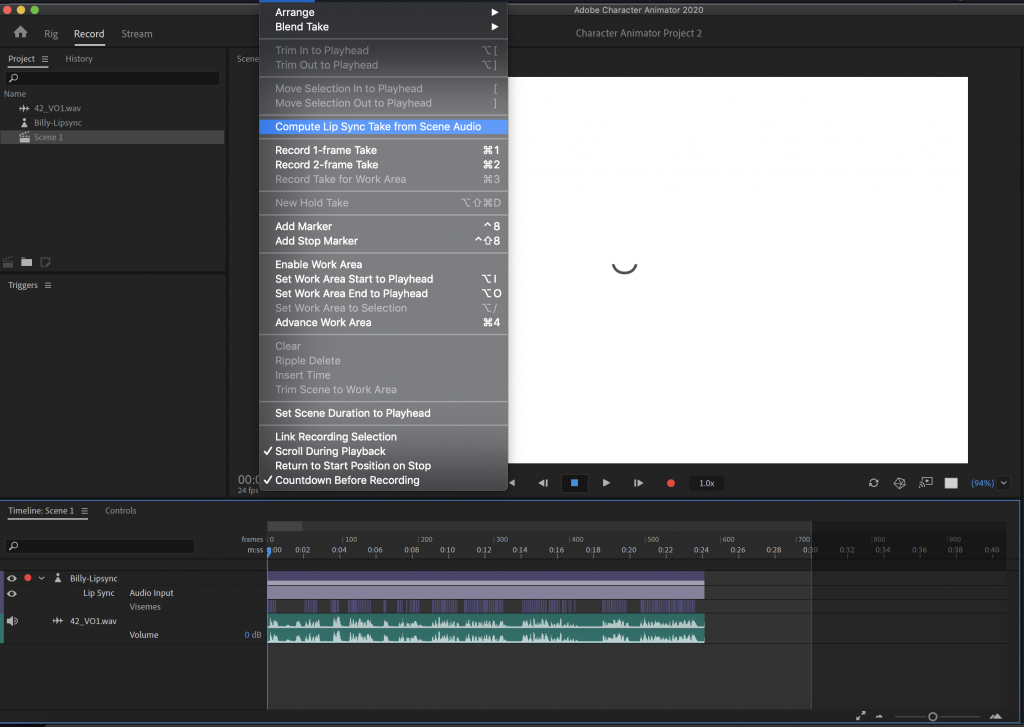
Now you will want to check the lip sync and fine tune it where you feel is necessary. Don’t rely solely on the automated sequence. Go through each line and make sure the mouth shapes match the words being said. It is much easier to fix the lip sync in this stage instead of in the review process.

Look at your timeline and under the lip sync you will find visemes. These are the mouth movements that are made based on the words that are said. Visemes can be added, deleted, and changed. You should change any visemes that do not accurately represent a sound in part of a word. For example, if the speaker says the word “wow” but the automated sequence used a “s” viseme you should change it. You should add new visemes when there are sounds that are missing visemes or an area of talking with no visemes.
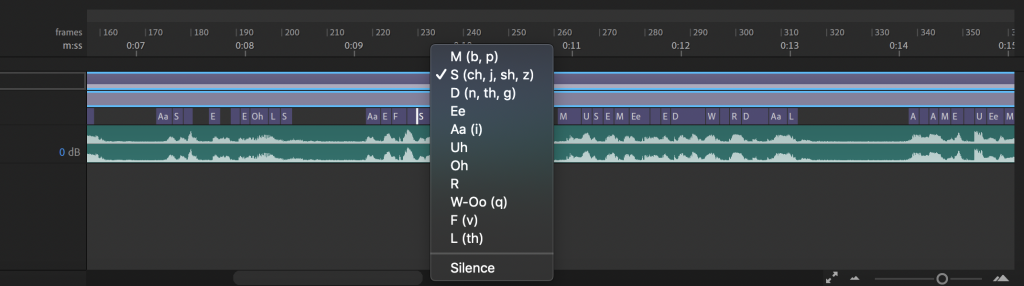
If a viseme is incorrect or unnecessary then you can delete it. To delete them, click on the viseme and click delete. To add new visemes select an already existing viseme where you want to add a new one. Then hit Command+Shift+D. To change a viseme that has already been placed, right click on the viseme and select a new viseme.
Exporting Out of Animator
Quick Tip!
Export each line spoken by Billy and Penelope as separate files. This will make editing much easier later!
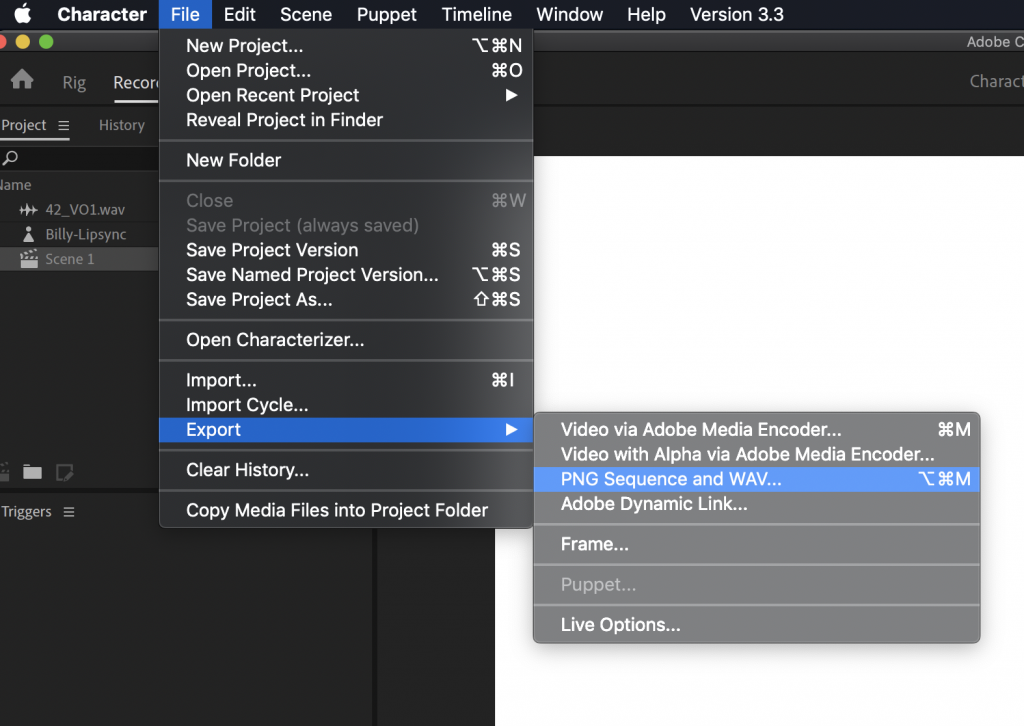
Once the lip sync is complete, it is time to export the lip sync out of Animator. First, click on the timeline, and place your playhead at the end of the voiceover. Then, at the top Timeline dropdown menu, click Trim out to playhead. This will ensure the export is only the lip sync part. Now at the top down menu, click:
File > Export > PNG Sequence and WAV
Select the location of your export, and name the folder for export. Then, click Save.
Each scene that is exported will create a new folder including several .png files, a .json file, and a .wav file. You should have folders for every spoken line. These folders will be used to import individual lines into your after effects file.
Putting the Lip-Synced Mouths on Characters
Quick Tip!
Save the Adobe After Effects file before doing any editing.
Open Adobe After Effects to begin compositing the robot’s mouth. At the top drop down menu, click File and click New Project. Then, create a new composition with the following settings:
- Preset: HDTV 1080 24
- Width: 1920
- Height: 1080
- Pixel Aspect Ratio: Square Pixels
- Frame Rate: 24
- Duration: 0:00:30:00
- Background: Black
Create three of these compositions for the three scenes. Create a 60 second duration composition for the entire episode. After creating all three compositions, create three folders in the project directory, and name the folders Robots, VO, and Illustrations. Use these folders to stay organized while editing.
Now that you have folders, it’s time to import the files into After Effects. You should find the robot files first. In OneDrive, go to The Loading Zone project folder, and then click:
ProjectsAssets > 00_general_assets > Robots >
- Billy.aep
- Penelope.aep
- Addison.aep
Inside the robots folder, import Billy.aep, Penelope.aep, and Addison.aep. Once imported, move them to the robots folder in the project directory.
Now find the background in The Loading Zone project folder OneDrive.
Projects Assets > 00_general_assets > background designs.
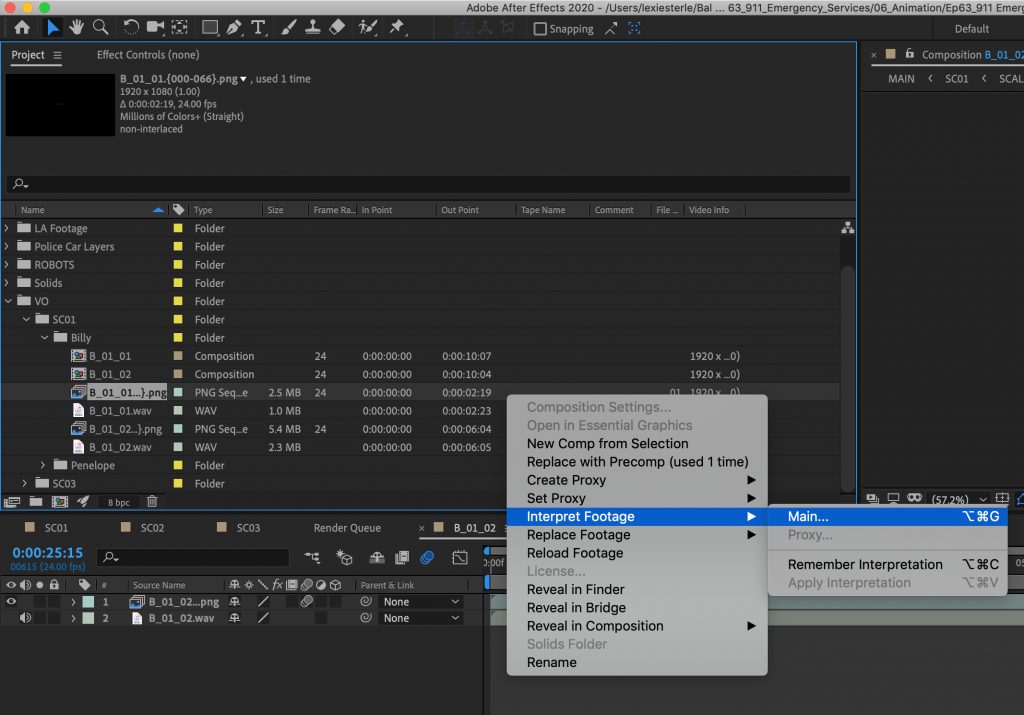
Import the background of choice into the illustrations project folder. Finally, select File > Import, navigate to your folder exported from Character Animator. Select all of the PNGs for that individual line, and then select the options for PNG Sequence and Create Composition. Name this new composition according to the line and character. For example, Billy’s second line in the first scene would be named B_01_02. After importing the PNG Sequence, import the WAV file from the line folder. Make sure to deselect the Create Composition box. Add the WAV file to your line composition and play it back to make sure the lip sync matches the audio.
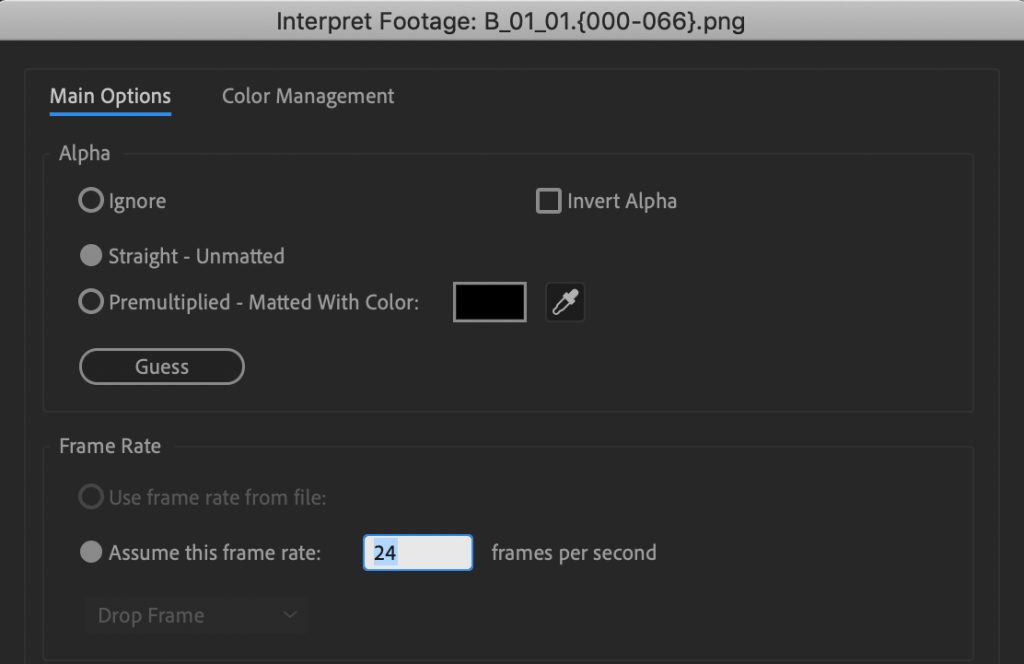
If your lip sync does not match your audio check the frame rate of the PNG sequence. It should be set to 24fps. This can be found in the project directory panel in the top left corner. Expand this panel width to reveal the full information spread for each imported layer. If the frame rate is not set to 24fps right click on the PNG sequence, select interpret footage, then select main.
In the frame rate section of the Main Options tab change the assumed frame rate to 24 frames per second.
Now for the final step of putting the lip synced mouth on the robot. In the composition created with the lip sync, turn on motion blur. Once that is turned on, you no longer need to do anything in that composition. In one of the other Scene composition drag and drop the background, robots, and the lip sync compositions into the timeline. Scale the robots to 145% and the lip synced mouth to 70%. Drag and line up the mouth with the robot’s mouth and it is complete. You have successfully lip synced and put together voiceover with the animated robot.