Captions
Quick Tip!
Save the “English by You” file on OneDrive in the Assets > Video > Captions folder for the project you’re working on. This way anyone can access them at any time!
Helpful Staff for this Topic


Accessibility is a vital aspect of media production, and in the age of video, captions are a great way to make content more accessible. This is extremely important for viewers with hearing impairments and auditory processing issues.
There are two types of captions. Closed captions are the most common; they are used by broadcasting and video streaming services like YouTube and Vimeo. Viewers must choose to turn on closed captions, which is typically done by selecting the [CC] button in the corner of the screen.
It is also possible to use open captions on your videos. Open captions are part of the video and are always visible. Viewers are not able to turn off or disable open captions.
At the Corps, we add closed captions on almost all of our videos. When a video needs to be captioned, a PM Team member or Brandon will reach out to let you know. Follow the steps below to add captions using the free tools available on YouTube.
How to Add Closed Captions
First, head to YouTube.com. You’ll need to login to the Digital Corps YouTube account using the credentials from Rob.
On the top right corner of the screen, click Upload Video. You’ll be redirected to a page where you can upload the video that you want to caption.
Allow your video to go through the whole uploading process. Once your clip is uploaded, you’ll be automatically redirected to the My Videos page. Select your video and click the pen tool.
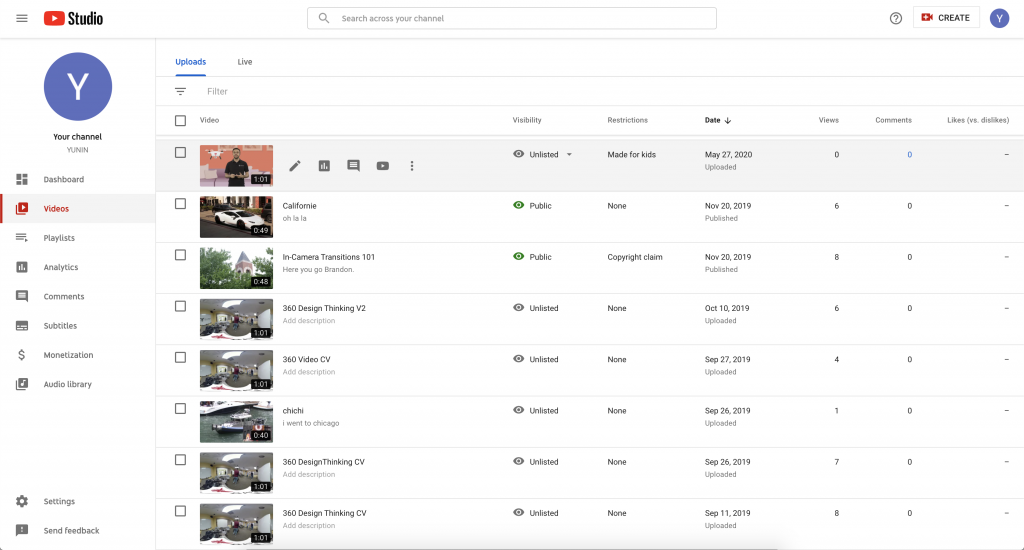

You’ll be redirected to the Video Details page.
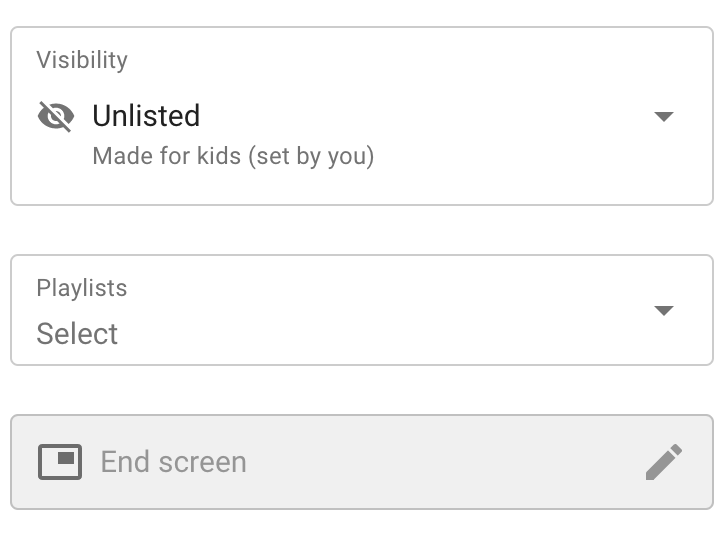
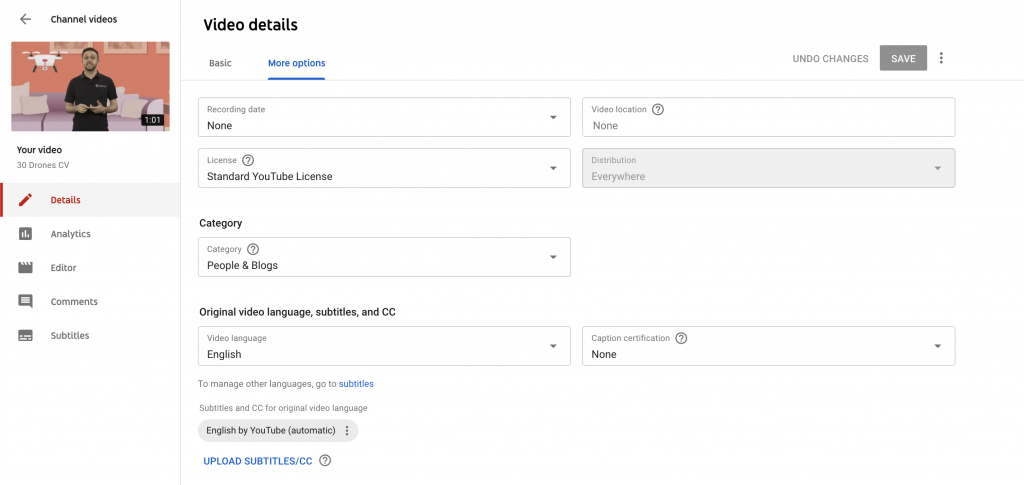
Before doing anything else, set your YouTube video to “Unlisted” by going to the bottom right. This will make your video private to everyone except those who have the link. Once you’re done with this, head to More Options which is at the top on the page.
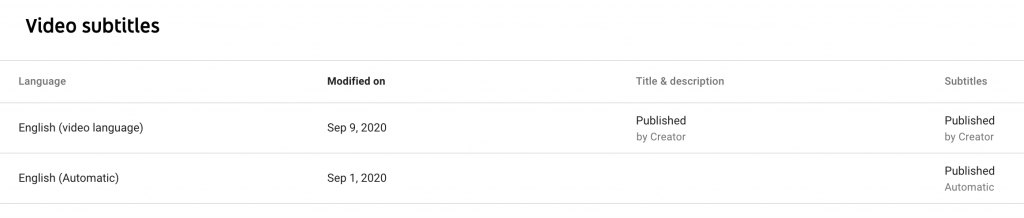
Once you’re on the More Options page, scroll down to the Subtitles section. There you will see a file labeled “English by YouTube (Automatic)” – this file is automatically generated by YouTube.
With YouTube Studio’s newest update, it now takes time for these captions to get generated. How long it takes depends on the length of the video and complexity of the audio. Check on the status periodically to see if YouTube has completed the captions.
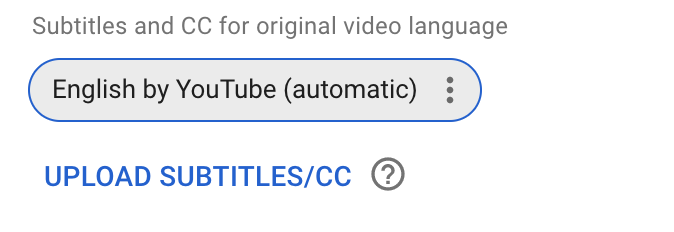
Once your captions have been auto-generated, select the three dots to the right and download the captions as an SRT file. After that, click on the Upload Subtitles/CC button right underneath and upload the same file that you just downloaded. Then click With Timing.
It should say “English by you” once you have uploaded the file.
Next, click the Save button on the top right corner of the screen. Then, click the Subtitles tab on the left side of the screen.
This will take you to a new page with two options. Click on Published by Creator and click Edit on Classic Studio.
YouTube’s automatic captions are mostly accurate, but review the captions and correct any mistakes, such as timing issues or misspelled words.
To edit and fix these mistakes, click Edit. Once the page refreshes, you can start editing the captions.
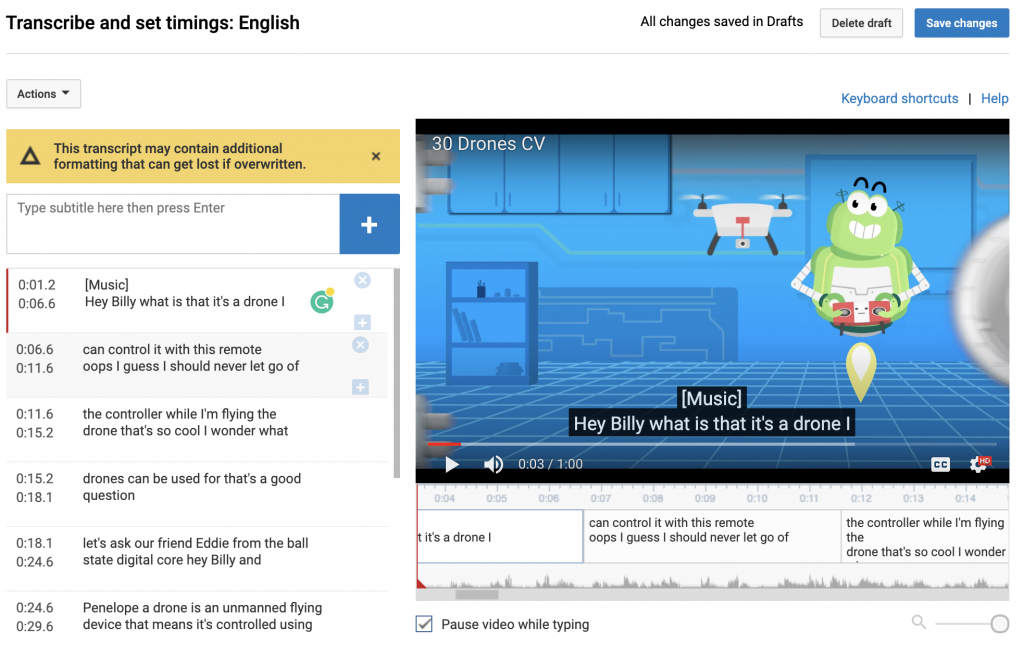
There will be mistakes that YouTube has made themselves. These will either be grammatical errors, punctuation problems, misspelled works, capitalization issues etc. Go through and fix these errors so that the captions come out well.
This can take some time, so be patient and thorough as you fix all of the mistakes.
Once you have corrected all of the mistakes, click Save Changes and then Publish.
YouTube will redirect you to the Classic Studio page, where you’ll see two captioning options: the auto-generated captions and your manually fixed captions.
NOTE: If your video will be hosted on YouTube, your closed captions are now complete. Be sure to change your video from “unlisted” to “public.”
If you want to use these captions for open captioning or other video streaming platforms, you will need to redownload your new captions.
To do this, click on the Return to YouTube Studio button on the top right of the screen. Once on this page, click on the Videos tab on the left side.
You’ll go back to the very first page you were on when you started. Move your mouse over your video and click on the pen tool again. After that, click on More Options and then scroll down to the Subtitles section.
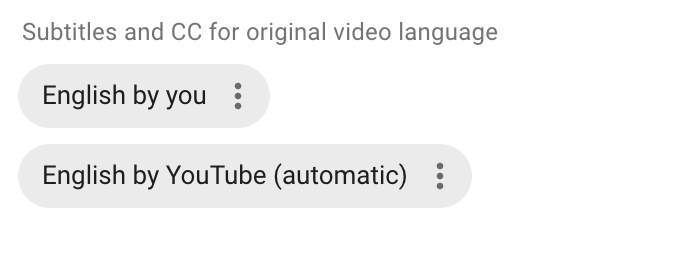
Download the “English by you” file instead of the “English by YouTube.”
Keep the file safe—it contains the captions you’ll need. In order to do this, upload the file on to OneDrive in the Assets > Video > Captions folder for your project. You can also upload this file to any site along with the video so that you don’t need to re-caption the video.
Vimeo
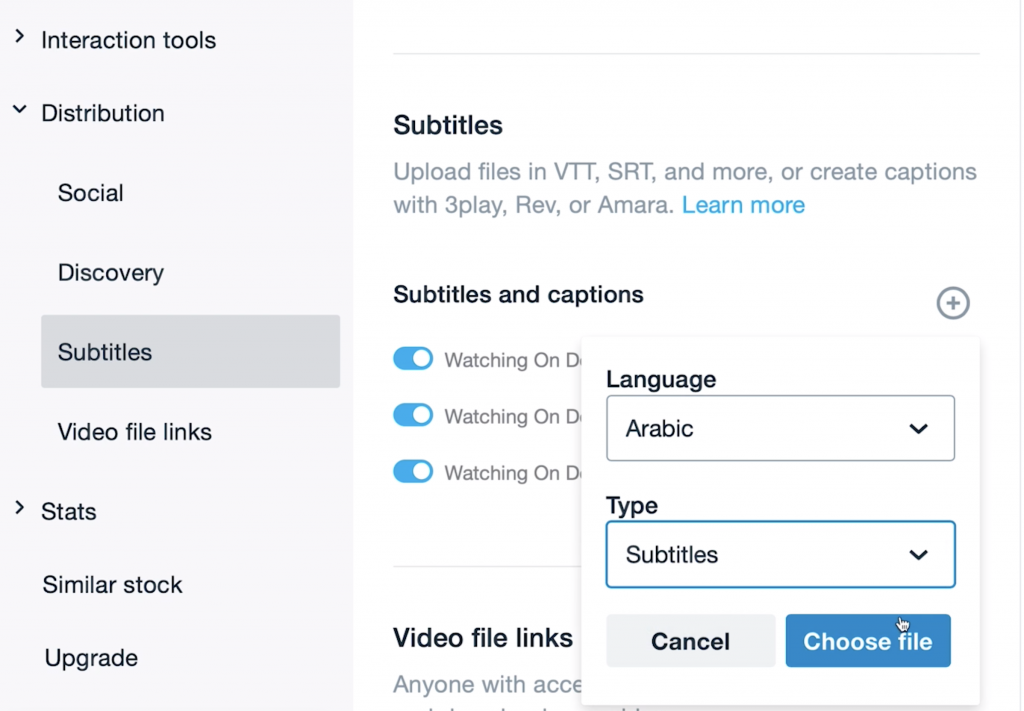
The Corps primarily uses Vimeo to host videos. With this in mind, upload the .srt file to accompany the video. In order to do this, log into Vimeo. Go to your video and then hit Settings then head to the Distribution tab. After that, click on Subtitles.
Click on the plus sign by the languages, and then go ahead and select what language your subtitles are, and then upload your file.
How to Add Open Captions
Open captions are ‘burned’ into a video, so they are added in Premiere before the final video is exported. To speed up the process you can begin by following the process laid out at the beginning of this reference guide. Make sure you have saved the “English by You” captions on OneDrive so you can easily access them.
First, open the Captions workspace in your Premiere file. If that is not an option in your workspace bar, navigate to the toolbar and select Window > Captions. This should open a new panel where you can input caption text.
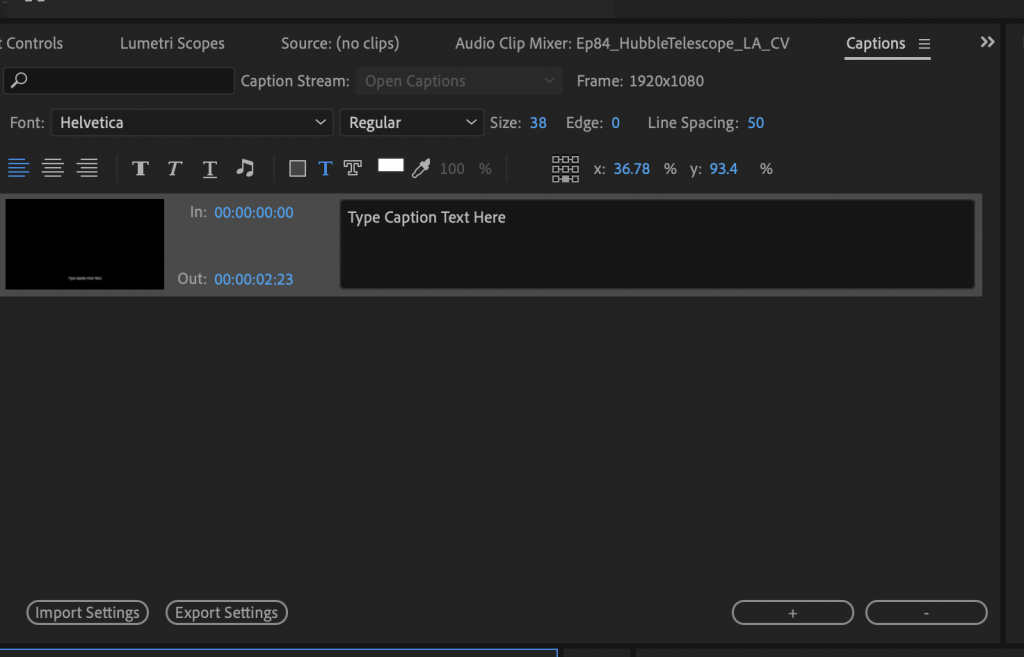
In the Captions window you can add new lines, edit text, and change the way text appears. You can also change the text size, font, opacity, and highlight color to make sure that it is clearly visible on the screen. However, check with Rob or your team members to verify the format and design are consistent with other videos for the project.
Next, import the .srt file from YouTube or OneDrive. This creates a new video layer with pre-created captions already timed to your video. Add that layer to the top track of the timeline.
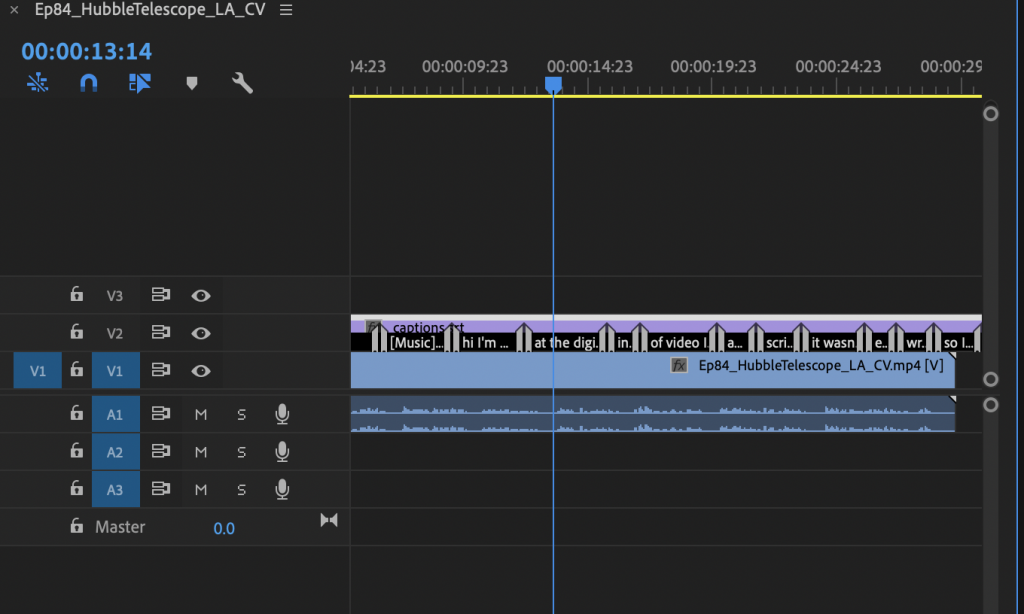
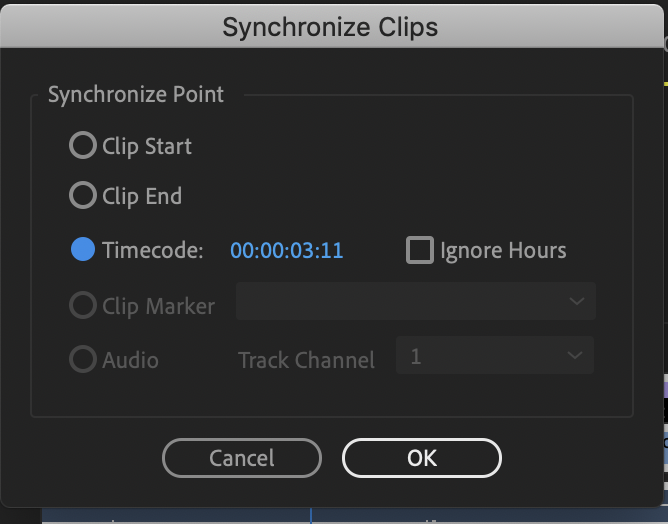
If the audio in the video does not start immediately, then the captions may be out of sync with the timeline. To fix this, you need to synchronize the caption layer with your video layer. Select both files, right click, and then select Synchronize.
A new window will pop up which gives you the option to choose how your clips will be synchronized. Select Timecode, and then press OK. This should sync your captions to your video.
Watch your video through with captions to catch any mistakes or changes that should be made. Once everything is corrected, you’re ready to export the video.
Exporting your Video with Open Captions
Quick Tip!
Make sure to watch your video before you export it. This will help you catch any remaining mistakes in the text of the captions, and see if there is any point in the video where captions are difficult to read.
Once you are ready to export, navigate to the toolbar and select File > Export > Media. For your video to export with open captions, you may need to adjust your settings. Below the Export Settings box, select Captions. Make sure that your export option is set to Burn Captions Into Video. After you change your settings, you can export your video.
