Git 101: Part 1 – Using the Terminal
Quick Tip!
Make sure to install the latest version of Git before you begin. To verify the installation and configure Git on your computer, follow the prompts listed in this tutorial for your corresponding OS.
Helpful Staff for this Topic

What is Git?
Git is a distributed version control system (DVCS). It is a software tool that records the changes made to a file (or group of files) over time. This allows developers to manage and keep track of all the changes made to their projects, which makes coordinating parallel work significantly easier – especially when a team is working on one program simultaneously.
Due to its distributed architecture, every developer working on a project has the entire project’s repository and full history of changes on their hard drive.
Git also gives developers the ability to return to past versions of their files and resolve any conflicts between concurrent work. This is done with the use of branches and repositories, both of which will be explained in this article, along with some basic Git commands.
This article will focus on using Git through terminal. If you are already familiar with this, please refer to the second article of the Git 101 series.
Repositories
A Git repository (or repo) contains all project files that are tracked by Git. Repositories can contain code files, images, videos, spreadsheets, etc. Typically, a README is also included, which is a file containing information and instructions regarding the project.
There are, however, certain files/folders that should not be included in a repo:
- Configuration files that may contain passwords, environment variables, and/or file paths that are specific to your computer.
- Generated assets or build files. Any files generated by your development environment or by compiling the source code.
Types of repositories
Git has two types of repositories:
- Local repositories – a repo stored on your computer with all the files and their commit history. Usually used when one is working on a project alone.
- Remote repositories – a repo that is usually not on your computer, but a remote server. Typically used when a team needs to work on a project together, with different team members retrieving files from it and committing changes to it.
Creating a new repository
To initialize a repository for a project, use your computer’s terminal software to navigate to the project folder. From the main folder, type the following command:
git initYou may notice this does not create any visible new files in the project’s folder. It does, however, create a hidden .git folder that stores all the information about your repository.
Branches
Branches are typically used when a developer wants to change something about the project. Whether it be testing a new feature or a simple bug fix, new branches can be created. The new branch offers the opportunity to experiment in an isolated environment without risking the stability of the main project.
By default, every repository includes a master branch where all commits are saved. This is unless you create a new branch and begin working there, of course.
Creating a new branch
While located in the project folder in terminal, you can use the following command to create a new branch:
git branch <your-new-branch-name>Note that using the git branch command – without including a branch name – only displays a list of all your branches.
Checking out a branch
Now that you’ve made your own branch, you will need to switch to that branch to begin working on it.
This is done using the checkout command:
git checkout <your-new-branch-name>Any work you do and commit will now be under this branch, it will not affect the files in the master branch (or any other branch).
Merging a branch
After completing all the changes/additions to the code in a specific branch, one has the option to merge this branch’s work with either the master branch or other branches.
The command to do this includes the name of the branch you want to integrate into your current branch. For example, if a developer created a new branch called development, and they wanted to merge it into their master branch, they would use the following command lines:
To switch to the master branch:
git checkout master To merge the development branch with the current branch, which is master:
git merge developmentNow, all the work from the development branch will be added to the main project, and all the commits will be added to the master branch commit history as well.
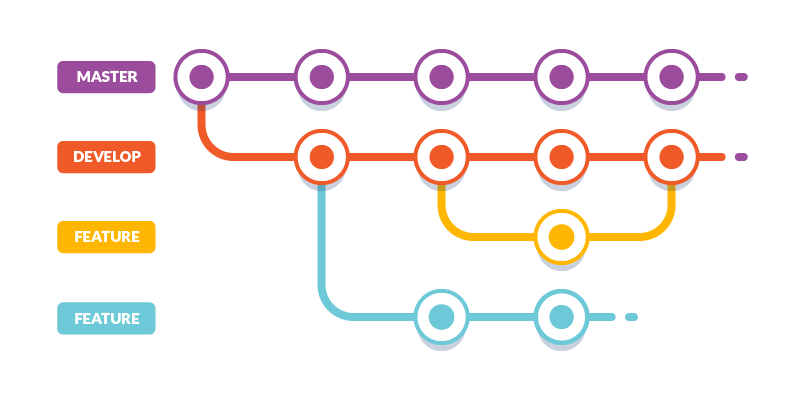
Git Flow at the Digital Corps
When working on a project, a certain branching model is used by Digital Corps employees. From the master branch, a new development branch is made – named develop by convention. After this, each feature of the project is given a new branch from develop, named according to the feature itself (e.g. feature/add-new-user-interface). Once a feature is complete, it is merged back into the develop branch.
This structure makes it easier for a large team to work on a project simultaneously, without causing a lot of merge conflicts.
Merge conflicts
When merging branches with simple differences (i.e. changes are on different lines, or files), Git automatically resolves them and merges the branches. However, when changes from each branch conflict (i.e. differences on the same line of the same file, or a file edited on one branch but deleted on another) you will need to manually resolve the conflicted files.
The status command can be used to gain further insight on the conflict.
git statusThis will indicate the unmerged paths, and in which file the conflict exists. Examining the file will show you the changes made with conflict dividers. For example:
<<<<<<< HEAD
hello
=======
hello world 2
>>>>>>> new-branch
These new additions would be found within the file/files with conflicting changes to indicate the following:
- ======= – this is known as the “center” of the conflict.
- <<<<<<< HEAD – any content between this line and the center exists in the version of this file from the current branch.
- >>>>>>> new-branch – content between the center and this line is present in the other branch we are merging to the current one.
The most direct way to resolve this is to edit the file manually: the user would remove the conflict dividers and choose which content to keep. Committing and merging after making these changes would be successful as Git recognizes that the conflict has been resolved.
Git Basic Commands
Clone
“Cloning” a repository downloads a copy of the repo to the user’s local computer. This is done when the user wishes to work on a preexisting repo.
Using the repository’s web URL, which is provided by the repository’s host, you would copy the link into terminal after the clone command. Like so:
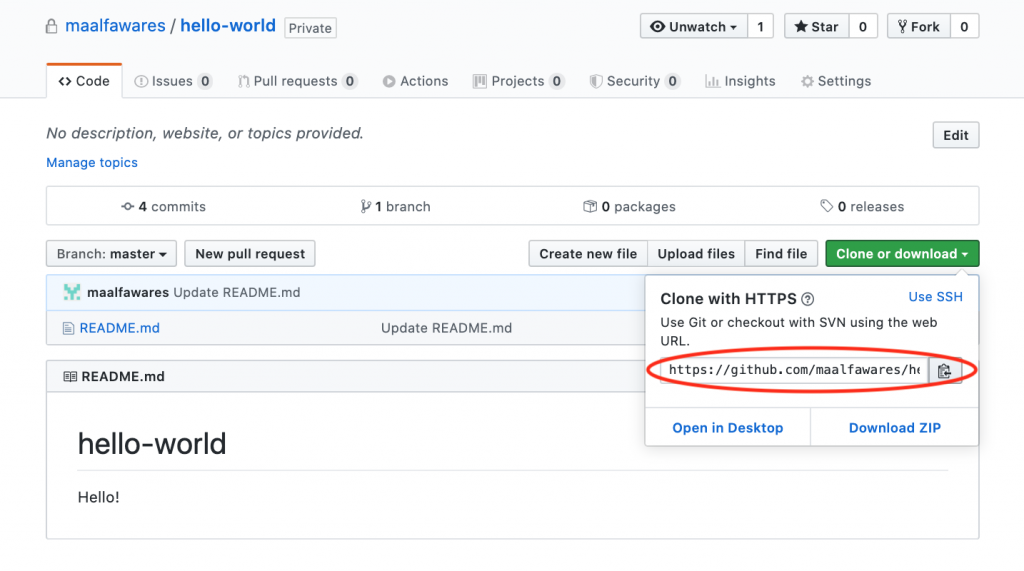
git clone https://github.com/maalfawares/hello-world.gitThis clones the master branch by default. To specify another branch, you could include the name of that branch following the link:
git clone https://github.com/maalfawares/hello-world.git -b <branch-name>Pull
While working with others, it is important to always “pull” any new changes or merges made by your teammates. This will keep your local files updated with any changes made to the project.
Use the pull command once you’ve checked into the branch you want to update.
git pullAdd and Commit
When creating new files in a repository, Git will notify you that these files have not been “added” or “committed”. This means that they are not yet being tracked by Git. To resolve this, use the add and commit commands.
First, the following command line will add new files to the staging area (a point at which they are ready to be committed and tracked):
git add file1.jsAlternatively, the following can be used to add all the files in the project folder at once:
git add .Next, the commit command is used once the files are in the staging area to save this particular snapshot of the code to the commit history:
git commit -m "The corresponding commit message" The commit message is used to communicate the context of that change to other developers. So, it is important to keep them concise and consistent.
Push
“Pushing” sends your local repository to the remote repository, which allows others to access it. It exports the local repo commits to their remote branches with the push command:
git push origin <branch-name>Now that the basics of Git with terminal have been covered, you should refer to the next article in this series to learn more about using Git with SourceTree (the preferred Git GUI at the Digital Corps). Note that the following article assumes the reader is familiar with the information explained above. If you are still unclear on some of the concepts, feel free to talk to a team member or staff.
Additional Articles:
This article is part of a series:
-
1
Git 101: Part 1 - Using the Terminal
-
2
Git 101: Part 2 - Using SourceTree
