Advanced Production Lighting
Quick Tip!
Lighting should always be motivated by elements in the scene. So when lighting a scene, take note of the surrounding environment, and tailor the lighting around it.
Helpful Staff for this Topic

Introduction
Lighting is a major aspect of any video production, and is something that makes a video all the better when done well. Since standard lighting principles are covered extensively during video team training, video team members should already be familiar with common terms and concepts related to lighting. This article will explain more advanced concepts and practices about lighting that are not as widely covered.
Light Quality
Light quality is a term that refers to the visual appearance of light on a subject. This may sound like a very broad term, but it can be broken down simply as: soft vs. hard light.
Soft Light vs. Hard Light
Soft light is characterized by minimal shadows/slow falloff and low contrast, whereas hard light is characterized by harsh shadows, fast fall off, and high contrast. With harsh light, it is also important to note that small details on a subject become more defined as opposed to soft light that tends mask those features. Because of this, light quality is a particularly important aspect to consider when shooting interviews for the Digital Corps since the objective goal is to make the subject look as good as possible. Typically, your main source of light should always be soft in an interview setup. This does not mean that hard light cannot be used elsewhere in the setup, but the key light in an interview setup always looks most flattering on a subject as a soft source of light.
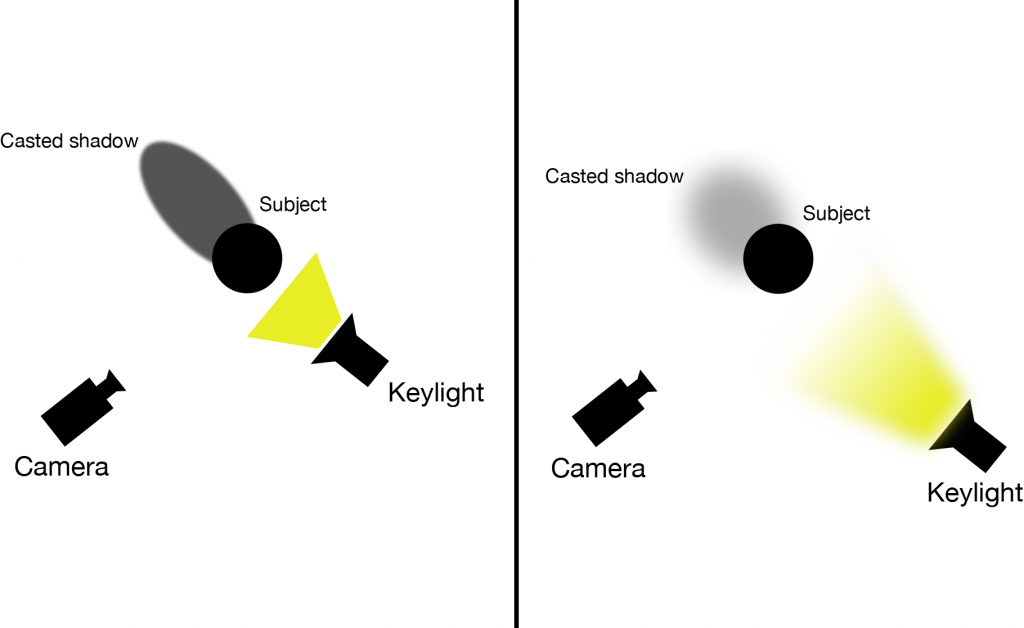
Source Size
The key component that determines whether a light is soft or hard is the size of the light source. The larger a light source is, the softer the quality of light becomes. A larger light source spreads light out in a wider area which allows it to wrap around subjects easier and create fewer shadows. In contrast, a smaller light source will cast distinct and harsh shadows because the light is much more concentrated and not able to spread as widely. At the Digital Corps, it’s common to use a small and hard-sourced backlight to define a subject’s figure and provide contrast between the foreground and background. One other idea to remember is that the size of a light source is not completely dependent on the physical size of a light– any source can be softened by using diffusion to spread light across a larger area. The Digital Corps uses 1×1 Astra LED panels for most production work, but these are hard sources of light by nature, so many times Digital Corps employees will need to use a softbox to soften the light quality. This is highly preferred for all interview work done at the Digital Corps.
Source Distance
One final component to consider when modifying light quality is distance. The closer a light is to a subject, the harder and more intense the light will be. Moving a light farther away from a subject will soften the light source since concentration of light will be spread out over a longer distance and thus a larger area. Keep in mind that when moving a light farther from a subject, the light’s intensity will diminish accordingly. Strong lights will have a long “throw,” meaning that they are to able maintain high intensities over longer distances. However, weaker lights have shorter throws which can be an issue when positioning a light far away from your subject.
When it comes to choosing the quality of light, it is entirely dependent on what style works best for the scene. As stated previously, soft light is typically preferred for interviews since hard light will often create harsh, unappealing shadows on a subject’s face. However, for a more dramatic piece, hard light may be completely appropriate to elicit emotion in a scene.
Color Temperature
Color temperature is a key component to consider in every scene, as it can be used to both make a scene look natural and give it a stylized look. The two most common color temperatures to be familiar with are 5600K and 3200K, with 5600K being pure daylight and 3200K being pure tungsten light. It is also important to understand that higher Kelvin temperatures are cooler in color and lower Kelvin temperatures are warmer in color.
Color Temperature in Practice
When it comes to lighting in practice, the color temperature of the artificial lights in the scene should be set to match the color of the natural lighting of the scene, and not mix with each other. For example, many environments that are used around campus for shoots feature fluorescent lighting. In situations like these, the best approach is turn off the fluorescent lighting if possible and use artificial lights to have full control of the control temperature and overall lighting in general. However, this is not always possible, so the next best practice is to match the color temperature of the artificial lighting to the natural, cool temperature of the fluorescent lighting. Many different shooting environments come with many different lighting scenarios, but this general principle can be applied to any environment no matter the lighting. However, there are some exceptions to this.
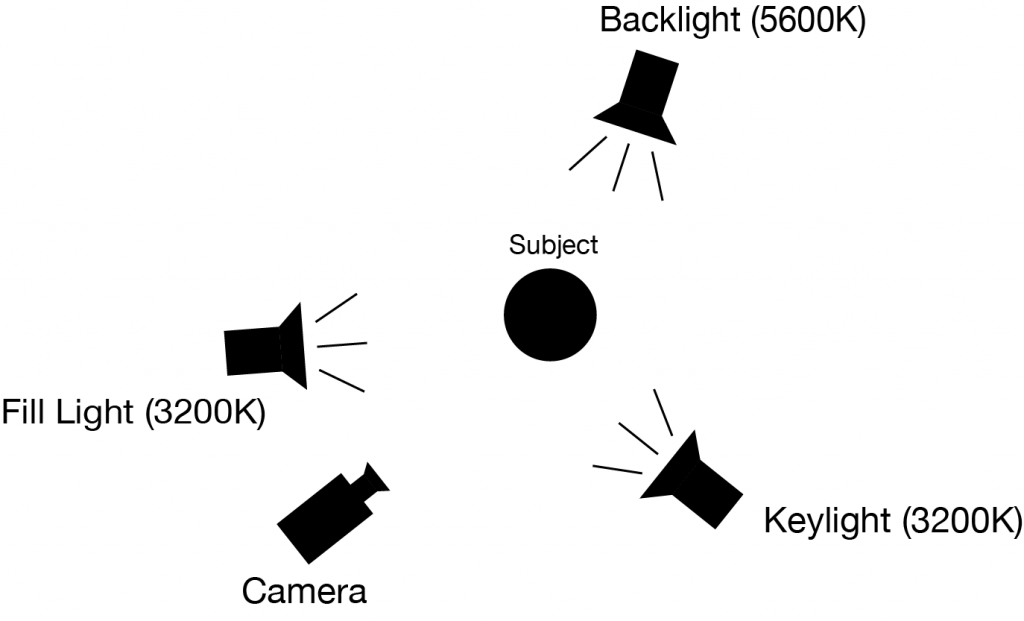
Mixing Color Temperatures
In certain locations, you may find that there is low contrast between the subject and background. Often times you will find this when shooting in offices or classrooms. In cases like these, it often a good practice to mix tungsten and daylight temperatures to create “color contrast”. Color contrast simply refers to the difference between two colors. In scenes with low subject-background contrast, a good way to create separation is to use a warm key light and a cool backlight. Other times it may be suitable to use a colored gel to create a more artistic look on a subject. Overall, color temperature allows for a lot of experimenting, and can help create a stylized look to any piece when done well.
Quick Tip!
Orange and blue gels are sometimes referred to as “CTO” or “CTB.” These are acronyms meaning “color temperature orange” and “color temperature blue” respectively.
Diffusion and Bounces
Diffusion and bounces are both modifiers that can be used to shape light in different ways. Shaping light is essential in achieving a high-quality image, so knowing how to properly use diffusion and bounces is important for all video team members at the Digital Corps.
Diffusion
Diffusion is one of most essential and commonly used items when it comes to lighting. As discussed previously, the main purpose of diffusion is to soften a source of light hitting a subject. But there are many different types of diffusion ranging from soft boxes to silks– all of which accomplish the same idea. The main differences between different types of diffusion are size and strength. For instance, a silk is a very large piece of diffusion, used for larger lights. However, a soft box is a much smaller piece of diffusion made to fit perfectly around a light. Remember, larger pieces of diffusion will yield a softer output of light.
Diffusion Thickness
The thickness of a piece diffusion determines how strongly the light will be diffused. Thick pieces of diffusion will create a softer look for your subject whereas thin pieces of diffusion only slightly soften the incoming source of light. However, diffusion can be layered to create a softer source of light. Typically, thicker pieces of diffusion should be used on a key light since thicker pieces of diffusion will bring the overall intensity of a light down significantly.
Choosing Diffusion
Determining what type of diffusion to use is entirely dependent on the situation. For example, a silk is primarily used outdoors since they are relatively large in size and cut the intensity of a light severely, making silks powerful tools for manipulating sunlight. Soft boxes and singular diffusion sheets are much more practical for indoor shooting environments– they can be utilized on just about any shoot whether it’s an interview or a b-roll shoot. Before any shoot, however, it’s important to assess the shooting environment and decide what type of diffusion would be most effective before even stepping on set.
Bounces
Bounces are large, opaque sheets of cloth used to physically bounce/reflect light. The main purpose of a bounce is to reflect existing light onto a subject as a fill or accent.
Types of Bounces
Bounces come in three primary colors: white, gold, and silver. Each of these casts a different color light onto a subject. White bounces are the most common bounces used on set as they reflect a similar color light from a source back onto a subject. A gold bounce will reflect warm light onto a subject, and a silver bounce will reflect cool light onto a subject.
Bounces as Diffusion
Bounces can also be used as a diffuser as well. The resulting light that they reflect onto a subject will be both soft and diffused. Because of this, they are used often for interviews and portraiture since the bounced light smooths subject’s skin tones.
Bounces in Practice
Lighting in tight spaces can be extremely tricky, but bounces can be very effective assets in these kinds of situations. In certain locations, it may be impossible to fit a light where it’s needed to go. Instead, a bounce may be able to be used instead since bounce boards are much lighter and less bulky than a physical light, and can be positioned more flexibly.
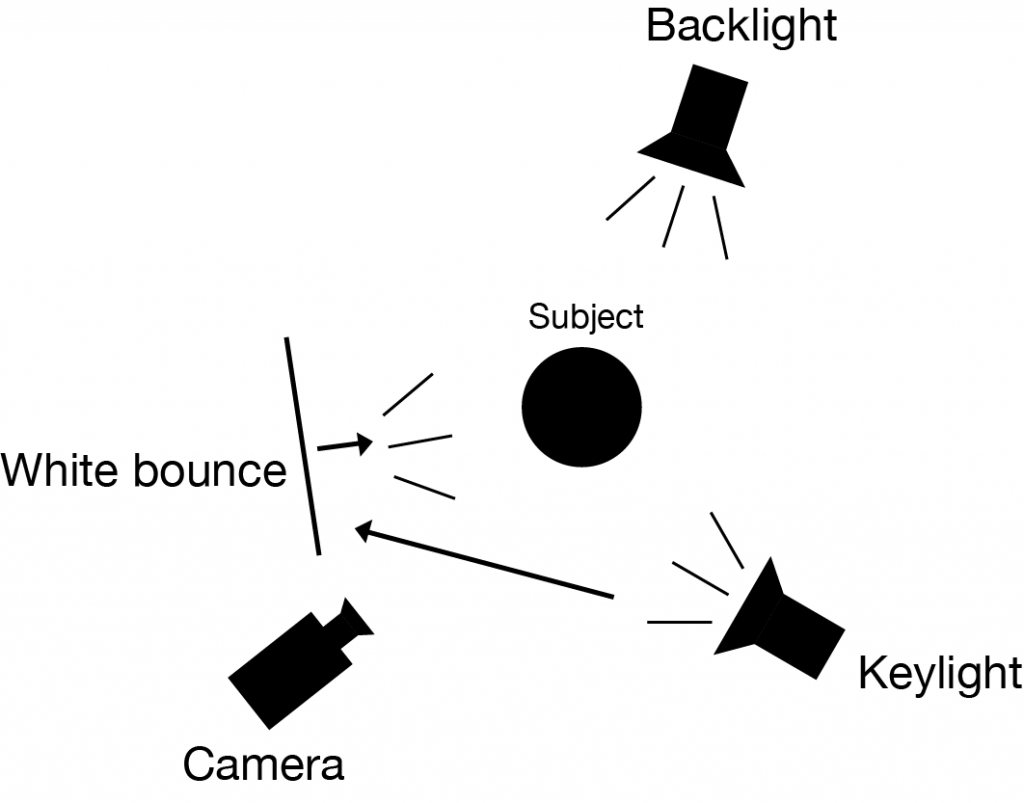
At the Digital Corps, there are a few useful techniques regarding bounces. Certain shoots can take place outside, and depending on weather conditions, the sunlight may produce an unfavorable shadows on a subject. This can be easily fixed by using a bounce positioned underneath a subject pointing upwards to reflect the natural sunlight back onto the subject as a soft fill light. Another essential use for bounces are substitutes for actual lights. In situations where a three light setup may not be practical, you can set up a bounce in place of a fill light and angle the key light in a way in which it both lights the subject and also hits the bounce to reflect light onto the opposite side of the subject.
Conclusion
Lighting is a key component to all video work done by the Digital Corps. Therefore, knowing how to control light and properly light scenes is essential for all video team members. As with many situations across the field of video, there is no one correct way to light a scene. Crafting effective lighting takes lots and lots of practice, however, with this information mind, creating high quality lighting should hopefully become a little bit easier.